Walls can start to look like Swiss cheese after removing, let’s say, cabinets or picture frames. Even minor mishaps can ding or put full-blown holes right through your drywall. Recently, a rigorous game of “monster” procured a hole punched right through the wall from my niece’s heel as she jumped down from the vanity trying to escape monster-auntie. Thankfully, her heel was fine. But, the wall wasn’t.
There are many methods to repairing wall holes, with the determining factors being first size, then location. Small holes can be patched with a swipe of spackle or joint compound, using a putty knife, then sanded smooth (a wet rag can smooth edges, too). For a small hole repair, spackle is ideal.
Spackle is a gypsum powder paste made with other binders that is sold in premixed tubs. It’s intended for repairing holes, dings and cracks in drywall or plaster less than about 4 inches in size. Spackle comes in a few varieties: lightweight, all-purpose, primer enhanced, etc. It dries quickly with minimal shrinkage.
Joint compound, aka mud, is made primarily from gypsum dust. It’s sold in powder form and mixed with water to a cake-frosting consistency. You can also find it premixed in tubs.
For larger wall repairs that require an added patch piece of drywall, mud is preferred because it allows a longer work time. Spackle can dry too quickly, making it harder to work with on larger surfaces.
Medium-size holes, a few inches big, need drywall tape over the hole, then it can be spackled or mudded. There are several types of drywall tape: paper, metal, fiberglass mesh, etc. I prefer a self-adhesive fiberglass mesh tape for repairs for its strength and ease of use. They also come in 6-inch-wide rolls specifically designed for wall repair.
Drywall patch kits are also available that include everything you need for a medium-size repair.
Larger holes, more than a few inches big, will require a patch piece of drywall to cover it. For holes greater than 6 inches, a 1-by-3-inch wood length should be added behind the hole, securing it with screws through the wall at each side of the hole, creating a “stud” to screw the patch to.
If your large hole is near a stud, cut away the drywall from the existing stud to give the patch a fastening point.
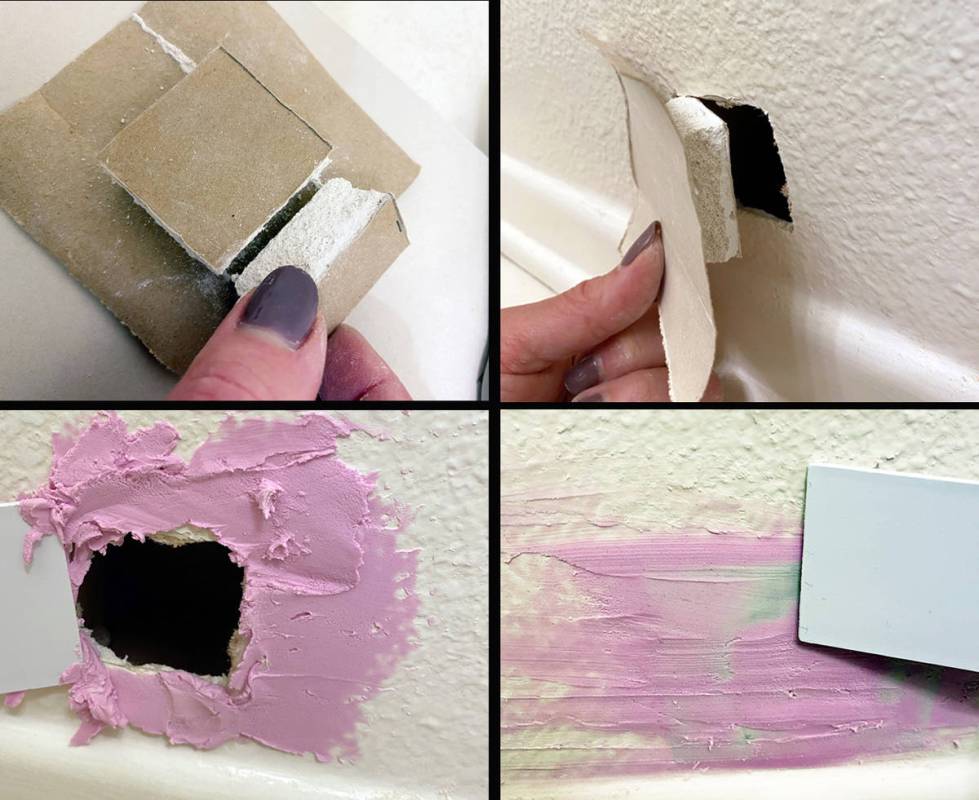
While my hole was only a couple of inches big, I decided to go with a more substantial repair given its location — at the wall base where little kicks threaten. I went with a type of patch that has several names: hot patch, hat patch, Dutchman, to name a few. I also used spackle that my sister-in-law had in the house that goes on pink and dries white so you know when it’s totally ready to sand.
To make a hot patch you need a scrap piece of drywall, utility knife, drywall knife (for larger hole), tape measure, pencil and putty knife. Here are the steps:
▶ Cut the whole to create a uniform square or rectangle.
▶ Take measurements of the now-squared hole.
▶ From your scrap piece, cut a piece 1-2 inches larger than your new square on each side.
▶ Put your repair piece face down, and score your square dimensions with a utility knife.
▶ Gently peel the “rock” away, leaving the hole plug and paper brim. Dry test the fit.
▶ Put spackle or mud all around the hole and dab a little water on the backside of the paper brim.
▶ Plug the patch into the hole, pressing down the brim, squishing out the mud.
▶ Smooth down the patch with the putty knife, spreading the excess mud over the entire patch surface, feathering edges. Let dry.
▶ Sand smooth. Recreate wall texture if applicable. Prime and paint.
Norma Vally is a seasoned veteran of home improvement; her career includes four seasons as host of Discovery Home Channel’s Emmy-nominated series “Toolbelt Diva.” A columnist and author, Vally splits her time in Southern Nevada, Los Angeles and New York City. Follow her on Facebook at Norma Vally “Toolbelt Diva” and visit her at www.NormaVally.com. Email Norma@NormaVally.com.